


Property Staking Best Practices for Snow Removal Services
Created April 4, 2020
Hidden obstructions can be dangerous for operators and may result in equipment or property damage. Marking pavement boundaries and hidden obstacles with stakes reminds drivers that danger lurks below.
- Create a System: Staking properties in the preseason makes it easier and safer for operations teams once winter hits. A system of marking stakes serves like a legend on a road map communicating important details on how to read the site so you can avoid making costly mistakes like pushing snow on top of drainage structures, fire apparatuses, sidewalks and hidden obstructions.
- Color Coding: The type, color, size, markings and locations of stakes can communicate specific details to help your drivers identify key property characteristics minimizing the potential for having to send crews back to correct improperly serviced sites.
- Communication is Key: The key to a successful staking program includes management defining how things are to be staked and communicating this information to drivers and operators so that everyone on your team knows how to read the “legend on the map” when they arrive on site.
- Visual Guidance: While you may know the property really well, stakes are useful to new or substitute drivers and operators to identify hidden dangers. Additionally, stakes can be helpful to other winter drivers who may be on the property during heavier events where pavement boundaries may not be as obvious.
- Site Inspections: Staking can also double as a site inspection, allowing you to identify and document any pre-existing damage or potential problems. These can be brought to the client’s attention so they can be addressed prior to winter. As well, when it’s time to take the stakes down, you can do a postseason inspection and see how well the stakes worked in protecting those hazards and whether you need to adjust staking procedures for the following winter
How to Stake a Site
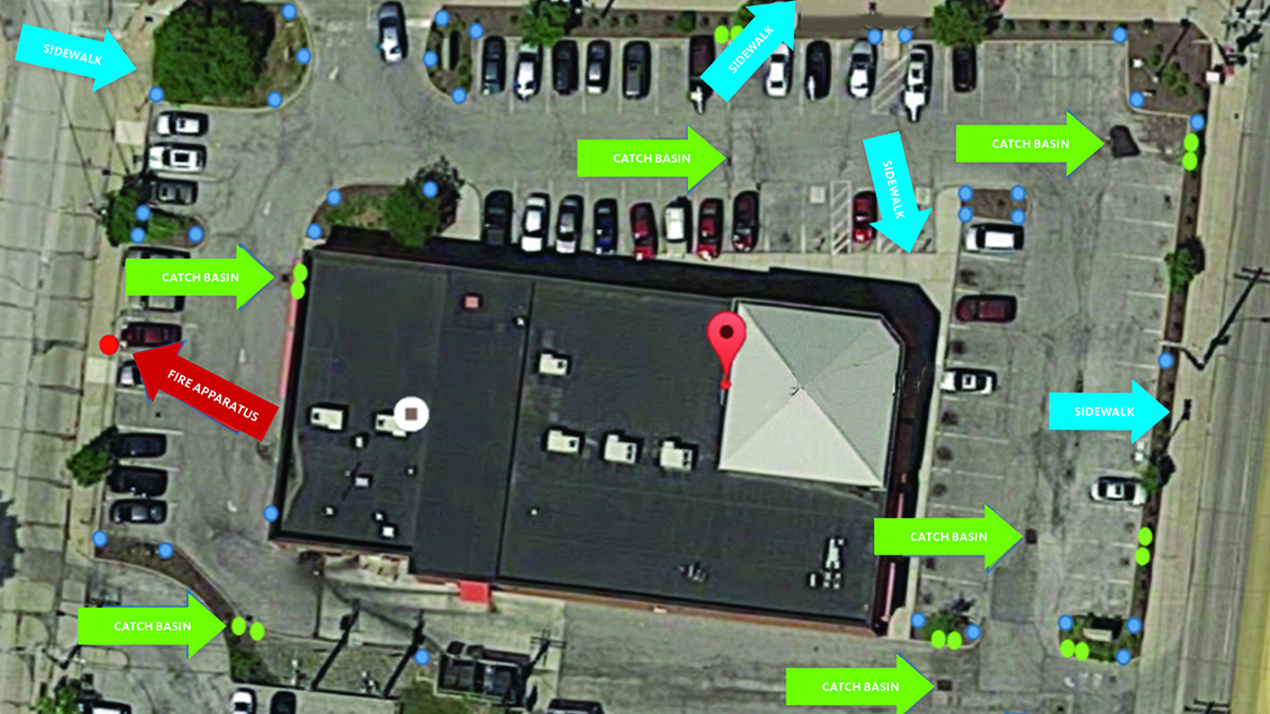
Proper staking will help to reduce or eliminate property damage, equipment damage and personal injury that results from striking hidden objects. Site engineering maps and staking should include where snow should be piled and the location of fire apparatus and catch basins and other hazards. The marking stakes reinforce the information and provide real-time guidance since the driver isn’t consulting a written map while plowing.
Check your local ordinances to make sure you don’t run afoul of any local rules regulating stake placement or timing. According to SIMA’s 52-week procurement timeline (www.sima.org/bestpractices), staking procedures should take place in mid-fall as part of the training and preparation best practices. Make sure to check your stakes throughout the season, adjusting and replacing any that may be damaged or missing.
Key Areas That Should Be Marked
Raised Hazards: Stake catch basins, drainage areas, manholes covers or other areas that may catch a plow blade. Install on either side of the hazard, or if it is in the center of a lot, place stakes on leading and back edges of the hazards in a noticeable location along curb lines across from the basin. Drains should be kept clear to prevent ice jamming and clogging.
Fire Apparatus & Hydrants: Stake fire apparatus and hydrants, utility boxes, gas meters, sewer vent pipes and other public safety hazards. Install adjacent to each fire hydrant, valve, standpipe or other apparatus. Blocking hydrants not only creates accessibility issues during an emergency but may also result in monetary fines.
Walkways: Stake interior walks to mark edges of lawn/landscape beds and/or heaved pavement.
Curb Boundaries: Stake pavement boundary lines, medians, parking islands and other obstacles like speed bumps. Do not place stakes in the center of plow push points.
Originally written by SIMA and SnowEx®.